If you don’t live in the greater Puget Sound area, you might know this without me having to tell you, Spring has sprung! Pre-summer even! OK, so I know I bitch a lot about the weather here, but did you know that Seattle just had the coldest April on record? Seriously? Seriously. We had nine days in April where the temp never topped the 40s, and we only had one day in April that hit the 60s. Plus, April 2011 was the 4th wettest April on record. Yeah. We’re coming for you 1991, 1996 and 1993. 20 of April’s 30 days had measurable rain. And I wondered why Kurt Cobain committed suicide when I was a a young, naive midwesterner. Duh doy. As we used to say in the 80s, Calgon take me away (from Seattle)!
But still, we persist and garden. We even plant tomatoes, even though in our heart of hearts we know that only lettuce and kale actually thrive here.
If you were following along last year, you’ll remember that Double S and I made 7 raised garden beds and felt like it was a pretty good first year, even though the weather sucked so much that we ended up with hundreds of pounds of green tomatoes, most of which ended up in the compost. Well, mainly because we were going to Kauai and didn’t have time to pickle or relish them. But we were going to Kauai, so who gave a fuck, amiright? We did grow a lot of lettuce, kale, cabbage, beans, garlic, pickling and slicing cukes, zukes, squash, arugula, chard, and even a few little eggplants.
I wanted to update you sooner with the ongoing story of our garden, but I was actually gardening (and drinking cider and watching Deadwood and planning trips) and so I didn’t get around to it. But it’s never too late! Here were our beds back in March.

Here you can see our cover crop and that we also covered the beds with burlap. After this season though, I'm covering them with straw.
This year our beds were already built and our soil is great. As Motley Crue might have sung if they were gardeners: Worms! Worms! Worms! We were lazy cleaning out the beds at the end of fall, but they’ve been cleared, cover crop has grown and been integrated, and our garlic planted last fall is getting huge (Squeal!). Back in late January, over a few glasses of wine, multiple seed catalogs and some butcher paper, we planned our garden for 2011. We mainly thought about crop rotation and sun. I felt like I could have taken classes and read about crop rotation, but my stories we’re coming on, so we drew a map and did not plant night shades where night shades were last year, or brassicas where brassicas were last year. I’m sure I could have done more, but whatareyagonnado?
In mid March, way later than I had planned in my head, we started seed under grow lights in the basement. Tomatoes, lettuce, chard, catnip (for the Bear!), basil, parsley, kale, and cabbage. In my mind, I was going to wake up on New Year’s Day, fresh as a daisy, and start my tomatoes under lights. Ok, not a true story, but I had good intentions to start them in January. But mid March worked out ok. I started tomatoes from seed around mid March, did the first up-pot in early April and the second up-pot in early May. They just finished up their final indoor weeks under lights and on heat pads and I’ve been hardening them off since Friday. Now that we actually had a few days that hit the upper 70s and even low 80s (gasp!) I’m hoping to get them in the ground within the next few days. Hideously late in other parts of the country. But hopefully right on time for good ole Sea town! Hell, I figured that if I was still wearing a wintery jacket, it’s not time for tomatoes to be outside, capiche? But did I mention my tomatoes look great? They do! And I sold some extras and made some dough to take a few landscape horticulture classes this summer. Here’s the up-potting process.
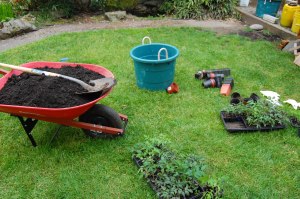
Materials for tomato up-potting: wheelbarrow of good compost rich soil, plenty of recycled individual plastic pots, organic fertilizer, fish emulsion and water.
We always save all of our medium sized plastic pots for this second up-pot. After I removed them from their 4 cell pots, I dipped them in fish emulsion, then re-potted them in good soil. I then finished the process by fertilizing with organic fertilizer and watering them thoroughly. After you get them nice and watered, don’t water them for awhile. Tomatoes like to get very dry between watering sessions. This goes for indoors and out.

Here I am, dressed like a mid 90s frat boy (complete with requisite Adidas flip flops!!, carefully removing the tomato seedlings from their 4 cell pots.
Done! And these puppies are watered, so be careful toting them around.
Here they are back in their basement lair.
Check them out now! Hanging out on my dining room table like they own the place. This weekend, they permanently leave the nest!
Enough about tomatoes. The shit ton of lettuce we started was individually separated into it’s own single cell pots by yours truly back in early April, and was hardened off for several days and planted just about two weeks ago. See above as to why we planted everything so late.
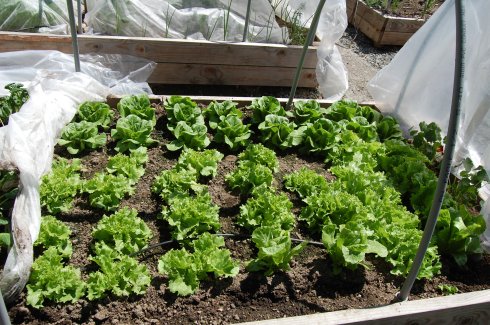
I put them in the ground about a month ago. Now, I really like salad. My mom will tell you that my brother and I loved salad more than the average children back in the 1980s. Especially, because it was St. Louis, from here. I now can eat salads with gleeful abandon. Check it!

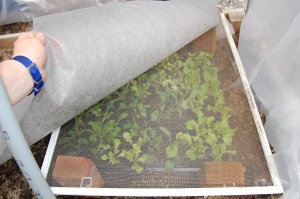
I used floating row covers this year to protect the lettuce, kale, chard, sorrel, arugula and watercress from slugs and sun, and lordy did it work! Recommended!
So the plastic cloches and the floating row covers were a success this year. The reason I told you all of the above whining about Seattle weather was to hopefully get a little sympathy at the extreme tactics we have to engage in to get anything to grow here. We use raised beds, PVC pipe frames, 3 mil plastic and clamps, slug bait, diatomaceous earth and floating row covers. We have to use a lot of shit to combat slugs around here, no joke. Don’t talk to me about salt or beer traps, that juvenile shit doesn’t work out here in the warzone. But this is funny!

I'm using cartoons in my blog. I am old. Now to shuffle off and watch Murder She Wrote. Why? Cuz Matlock ain't on till later.
I also go outside and stomp the crap out of them whenever I get the chance. So if I die in my sleep, the crime scene will probably be something like this:
Anyway, here’s the rest my 2011 garden! As you can see, we dutifully use plastic row covers and probably will continue to do so until mid to late July. Here’s an overview of our covered beds.
Here is the garlic we planted last September/October.
Here’s my onion bed…my pride and joy so far. This is the first year I did a large amount of onions. These are red and yellow onions started as bulbs or sets. I also interspersed Walla Walla sweet onion starts throughout my other beds.
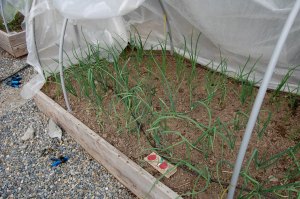
Again, these are huge now too. Anyone have any tips as to when to harvest onions in the Pacific Northwest?
One of our first plantings was peas. Typically, y0u can sow peas outside in the Seattle area right around President’s Day. We did ours later. I think we also cloched them, too long, as we have already detected some powdery mildew. Next year, I will sow early and leave them uncloched. It isn’t recommended to start peas inside, but we actually had good luck with it.
We also have quite a few perennial herbs going from last year. We have thyme and tarragon in the beds, but we mainly use 5 gallon buckets to control the spread of the herbs. Our yard is only so big, you know.
We got a small chocolate mint plant two years ago that we brought with us in the big move. It still lives. And finally, this year, I’m thinking ice cream. Especially since I just got this bad boy. Thanks for the b-day present, Mom!
Oh, and have I told you about my strawberry patch? We designated half a raised bed for strawberries this year. Planted them in early April. Due to slugs and squirrels and birds and cats in the yard, I came up with a little system. First, I mulched the bed with straw from here (best store ever, especially if you want a no frills actual farm and feed store). Then I made a cage with leftover chicken wire. So far, so good!

Third and biggest berry harvest so far! June 7. Will I have enough for ice cream or sorbet? We'll see, kids.
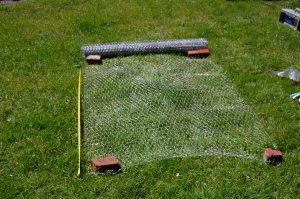
Also, speaking of straw and chicken wire, I made potato towers this year. I read eleventy gazillion ways to grow potatoes. thought about devoting a whole bed to them. I thought about building condos from wood. I ended up deciding on making potato towers by rolling 5 foot long pieces of chicken wire into tubes. Potatoes grow best in super light soil. So this year, after much research and talking to local gardeners, I’m using straw and a light coating of compost/loamy soil. I’m hoping this system works, because it will be super easy to hill the taters up with lightweight straw and when its harvest time, just pull up the towers. I secured the wire to the ground with T posts, as it gets mighty windy around here. I put the towers in sunny spot and have been dutifully watering them. I’ll let you know if this works…because potatoes are awesome! I planted russets and a variety of other fingerlings. I didn’t cut the seed potatoes, as I waited really long to plant them cuz I’m lazy and couldnt decide which medium to grow them in.

You need a roll of chicken wire, wire cutters, a tape measure, some sturdy gloves (keep those precious fingers, y'all!) and metal T posts.
I listened to this.
And here I thought I loved Peter Cetera era Chicago! But man oh man, old school trombone-y Chicago is my shit right now. Can you dig it? Yes I can.

I attached the chicken wire to the T post with extra wire. Then I hammered the T posts deep into the ground--it gets windy here.

I then added about an inch of good compost-y loam. I then placed the seed potatoes about an inch apart. I topped them with straw and a bit more soil.

Here's the tater patch. I'll let you know how the experiment works! Update: I just saw my first green in there, after less than 2 weeks!
Also, if you followed along last year, you’ll know I finally had great success with my cucumber patch. I bought the starts last year from the awesome Langley Fine Gardens. I bought cukes from them again this year, but I was also able to start my own under lights and successfully transplant them, which I read wasn’t recommended but has worked great for me so far. Here’s the cuke patch. I’m thinking pickles, as usz!

Here's the patch. I still have it covered by cloche. I also use the hacked sour cream containers to keep the slugs away--works like a charm. And because I'm an optimist, I have a size small tomato cage ready for the all the cukes to rest on. I'm also going to be re-purposing an Ikea cd rack from a garage sale as trellis in here too.
Last year, I had cukes spread all over the ground and sidewalk so I couldnt even find the ripe ones and many yellowed. Not this year, friendos!

I'm trying little Persian cukes again this year for cornichons (which i love). Last year, I had no luck with this. See above re my cuke optimism.

I'm also trying Mexican sour gherkins again, which were another no go last year. So far so good this year.
It’s now June 8 as i write this and the harvest is coming! I’ve made salads a plenty: caesars, bread salads, regular old weeknight salads, you name it! And see above re our strawberries. We’ve also had our little asparagus peeks all spring too. We should get our first asparagus harvest next year–year 3 after planting.
We also have our berry patch, which we’ve expanded this year. We have a LARGE patch of raspberries, mostly descended from Double S’s old family patch from the mini farm in Bellevue she grew up on. Best raspberries I’ve had! In addition, have a productive blueberry bush that we inherited when we bought the homestead. And new addition this year: boysenberries and elderberries. This excites me a bit too much!

Our berry area. On the left here is our huge raspberry patch. In the large wooden pot in the right front is the blueberry. In the ground in front of the blueberry pot are our two new elderberry plants. In the background on the right in another wooden pit is our new boysenberry bush.
I still have to plant my tomatoes (Tomorrow! This post has taken a long time to write, okay?) and plant our little squash/pumpkin patch. last year squash and zukes took over our beds. This year…squash segregation!
Happy gardening, everybody!








Holy shit friend! The garden looks amazing!!! Nice work!
thanks friend! we’ve been working our asses off on it!
We tried the pallet potato container this year. We took 4 stood them up and then screwed them together. Fill the side holes with hay (no straw in these parts) and then fill up more and more as the spuds grow. I’ll keep you posted on how things work out. At harvest we’re supposed to take out the screws, drop the pallets and have a grand harvest.
definitely let me know how it goes. it seems like there iss a thousand different ways to grow potatoes! i like the pallet idea–so easy to find ’em around here.
nice work, your garden is the truth. my fave line is “…we started seed under grow lights in the basement.” that’s hardcore green thumb. those tomatoes look perfect, any chance you might be willing to sell some extra tomato starts, or maybe some of those raspberries?
hi-oh! thanks for stopping by peter! just for you i might sell some more tomatoes or raspberries. although you may have some kind of copyright ownership over the berries anyway…
Hope you will join us for the July Spice Rack Challenge! You are missed.
i have an entry for june, bit, but couldnt get it posted on time. i hope to havr\e it up tomorrow. thanks for the note!
Nice post! Is there a Pasta House in Hilton Head? Salads and ice cream every night for dinner this summer! Don’t tell any Chinese medicine practitioners about that coooold diet!
i dont think there are any pasta houses at hilton head…drat! but im sure my mom will be whipping up her pasta house inspired salads most nights of the trip, with cinnamon ice cream for dessert! cant wait!